Gravity Forms is the quintessential forms plugin for WordPress users. It’s a powerful tool with countless features and customizations. New users can see right away why it’s one of the most popular third-party WordPress plugins in the world.
But like a lot of advanced tools, it’s easy to become “feature blind.” This refers to when a software tool has so many features the average user doesn’t know them all. Some people can use a tool for years without exploring its full feature set.
Sadly, some users waste time on manual tasks that Gravity Forms will automate. Other users pay for expensive third-party tools to get features that are already included in their Gravity Forms plug-in.
As a Gravity Forms certified developer, we’ve had the opportunity to explore the plugin’s entire functionality. In this article, we’re going to lay out some powerful features that many Gravity Forms users aren’t aware of.
Some users waste time on manual tasks or pay for third-party tools when Gravity Forms can handle it for them. Share on X1. Learn Where the Form was Completed
Like a lot of sites, you probably have the same form appear on multiple pages. For instance, if the form sits in your blog sidebar, it will appear on every blog post.
In these cases, it would be helpful to know which pages are converting more than others. You could analyze that page to learn why it’s so effective and then update your other pages to reflect that learning.
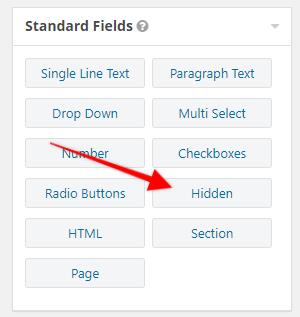
In Gravity Forms, you can add a hidden field to a form that users can not see. This field simply records the name of the page on which the form was used. It will appear as a field in that form’s list of entries.

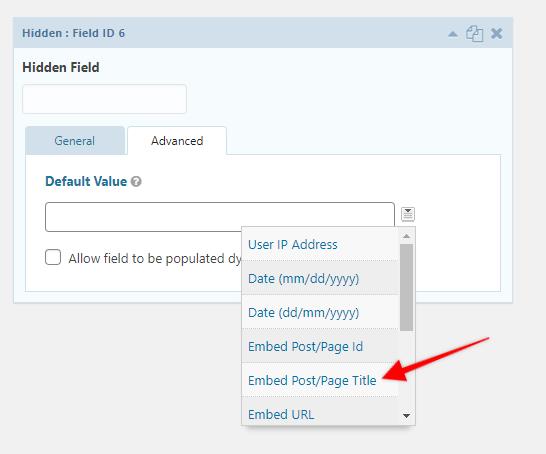
First give the field label a name so you can distinguish it from other fields. Then in the Advanced tab, click the drop down selector next to the Default Value field and choose Embed Post/Page Title. (You could also choose Embed URL if you prefer that format.)

2. Nest Form within Forms
Sometimes you need to collect complex data points that relate to one another. In these cases, a simple linear form just isn’t sufficient. You need a more robust solution.
For example, imagine you’re using a form to register teams for a sports league. When someone registers a team, you also want them to register individual players. You could put all of this information on the same form, but that would make the entries hard to sort.
A better solution is to nest one form inside the other. This makes sure you capture all the data points without making things confusing. Gravity Wiz has a great demo you can interact with.
Setting this up is simple: First, create both forms separately. In the parent form, add the Nested From field and select the child form. An “Add Entry” button will appear on the parent form. When clicked, the child form will appear as a popup overlay while the user completes the parent form.
If those steps aren’t clear, check out this longer tutorial.
3. Accept User-Generated Content
Some sites like it when contributors or users submit their own content. This is a great way to fill your site with great content and foster a community of fans. For instance, you might want users to submit…
- Ads for a job board
- Guest blogs
- Events to a calendar
- Products to your eCommerce store
- Their information to a directory
Imagine running a job board that gets 50+ new listings every day. Publishing those yourself would be time consuming. Users have to send you that information anyway, so it makes sense to combine a publishing automation with the submission form.
With Gravity Forms, you can give users a way to submit their content directly to your WordPress site. This content can be published immediately or saved as a draft for your review.
First, you’ll need the Advanced Post Creation Add-On. This add-on comes with a Gravity Forms Elite License.
When you create a form, you’ll need to map each field so Gravity Forms knows where that field’s data belongs on a page. For example, you’ll need to tell Gravity Forms which Single Line Text field is the post’s title and which is the post’s featured image URL, etc.
Once your fields are set up, your next step is to create a feed. A feed gives your form the power to send data somewhere else. In this case, your form will trigger WordPress to create a page or post.
To create a feed, we recommend reading Gravity Forms’ longer guide on advanced post creation. It’s not difficult, but there are a few steps based on the complexity of your form and the type of post/page you want it to create.
4. Add Conditional Logic
Conditional logic is a basic if/then statement. If X occurs, then Y happens. You can use this type of logic in Gravity Forms to make your forms smart and personalized to the user.
Here’s a basic example of conditional logic: Let’s say you ask, “How did you hear about us?” and give five options. The fifth option is “Other.” If a user selects “Other,” a text field appears that instructs them to type their details. If the user chooses any of the other four options, the text field never appears.
Obviously this can have many applications. By making forms appear or disappear based on user responses, you can 1) make your forms nice and short unless the user responds in a way that requires an additional question, and 2) personalize your forms to the user so they’re only answering the questions that pertain to them.
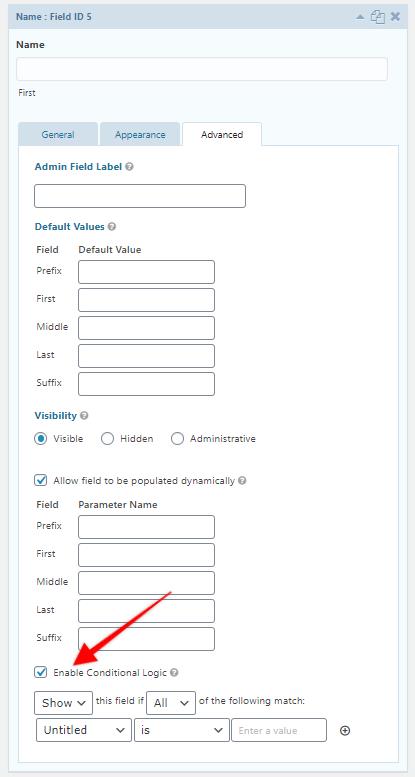
To enable conditional logic, you need at least one field that supports it (most fields do). Then select Enable Conditional Logic in the Advanced tab. Some more options will appear.

Adjust these options to your liking. It helps to read the syntax like a sentence to understand your logic statement. E.g. “Show this field if all of the following match. Number field is 8.”
5. Accept Online Payments or Donations
Contrary to popular belief, you don’t need a complete ecommerce shopping cart like Woocommerce to accept payments or donations. You can create products and accept money online right through Gravity Forms.
To get started, you need an account with a payment processor and the associated Gravity Forms Add-On. Gravity Forms has add-ons for PayPal, Stripe, Authorize.net, Square, 2Checkout, Square and Mollie. These require a Pro or Elite license.
Next you’ll need a form with basic information, such as name, email address, and local address if you ship physical goods. Most importantly, you’ll need the Credit Card field for customers to input their payment information.
Finally, you’ll need to set up a feed that connects your Gravity Form to your payment processor. This requires a few steps, but they aren’t complex. Read Gravity Forms’ full guide on merchant integrations to learn how.
6. Turn Data Into Charts
Hard data points on their own are rarely useful, especially when you’re trying to compare them together. The best way to understand (or help your readers understand) is to display your data visually. This helps our brain create connections we normally wouldn’t see by looking at a table full of numbers.
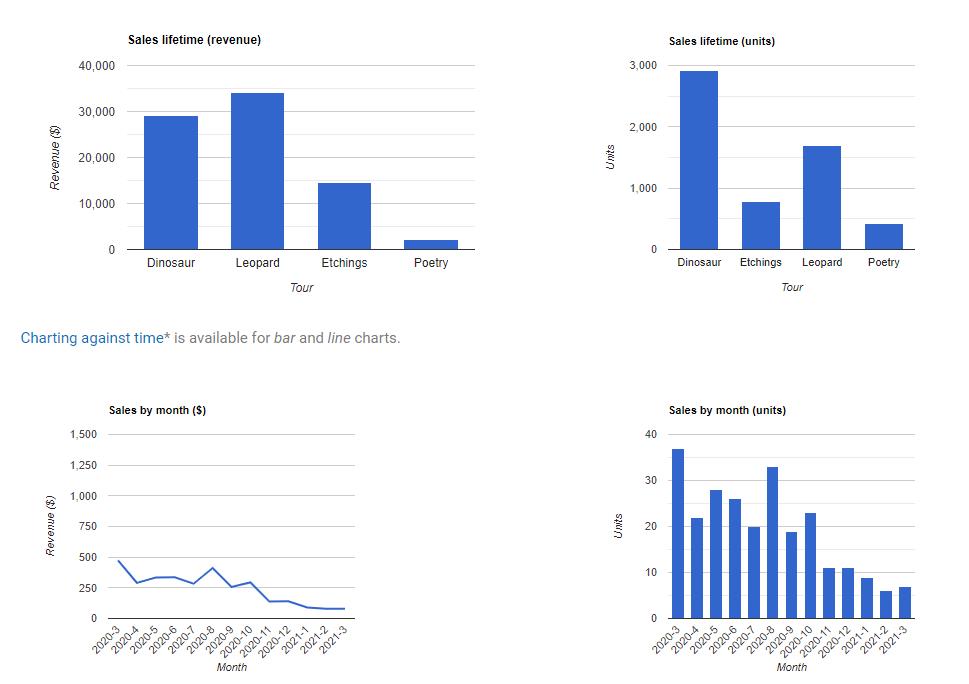
You can turn your Gravity Forms data into professional, visually appealing charts and calculations with GFChart, a third-party add-on. You can display these reports in posts, pages, widgets, emails, and even PDFs. This is a great way to empower your audience and your team with valuable information without spending a lot of time creating reports manually.
Here are a few examples of the possible outputs with GFChart. See more sample outputs here.

Making a GFChart is just as easy as making a Gravity Form. It only takes a few quick steps. Read how to make your own chart in our complete guide.
Going Forward
As you can see, Gravity Forms is a powerful tool with lots of functionality. We’ve shown you six features and use cases you may not have been aware of, but there are probably more. We encourage you to explore the entirety of Gravity Forms, even if your needs are small. A single feature might open your eyes to more efficient systems and workflows.
